HTTP/2 became an official standard in May earlier this year, and support is starting to land in servers already. The most recent, and very welcome addition, is nginx 1.9.5 [1]. What makes nginx extra awesome is that it’s very easy to set up in front of any other HTTP 1.x server (or HTTP/2 for that matter). Server push won’t work just yet, but at least we can start to test how multiplexing works. Multiplexing is said to eliminate the need to concatenate resources into bundles. At FINN.no we do multiple releases a day, and it just feels wrong that users have to download the whole 100+ kB JavaScript bundle after every release, even though most of the time only a few lines have changed. If we don’t need to bundle anymore, the users only need to download the few scripts that had changed since their last visit!
HTTPS over TLS 1.2 is a requirement to use HTTP/2. Service Workers also require secure connections, and probably other features soon.
This guide will help you set up nginx for local development on OS X, with proxy passing requests to your local server on port 8080 (or whichever port you prefer). In plain English, that means we put nginx in between your browser and your local development server. Your browser communicates securely over HTTP/2 to nginx, and nginx forwards the requests to your local server over unsecured HTTP/1.1.
Installing nginx
You have to compile nginx with the --with-http_v2_module configuration parameter, but Homebrew makes that a breeze. It’s one of my favorite tools on OS X.
If you don’t have Homebrew, see Install Homebrew further down.
To compile and install nginx with http2:
$ brew update   # update list of packages
$ brew install --with-http2 nginx
Test that the install works (make sure port 8080 is available):
$ sudo nginx
$ open http://localhost:8080/
You should see a page with the title “Welcome to nginx!”
# stop nginx
$ sudo nginx -s stop
Now it’s time to set up the https server with HTTP/2 enabled. Open /usr/local/etc/nginx/nginx.conf in an editor, and comment out the existing server section. Then copy-paste in the config below instead[2]. If your local server runs on a different port than 8080, you can change it in the proxy_pass URL.
server {
    listen                     443 ssl http2;
    server_name                localhost;

    ssl                        on;
    ssl_protocols              TLSv1 TLSv1.1 TLSv1.2;
    ssl_certificate            cert.pem;
    ssl_certificate_key        cert.key;

    location / {
        proxy_pass          http://localhost:8080;
        proxy_set_header    Host      $host;
        proxy_set_header    X-Real-IP $remote_addr;
        proxy_set_header    X-HTTPS   'True';
    }
}
To use https we need to generate a self signed certificate. It will give you a warning in the browser, but it works fine for local development. This command will generate the certificate [3]:
$ cd /usr/local/etc/nginx/
$ sudo openssl req -x509 -sha256 -newkey rsa:2048 -keyout cert.key -out cert.pem \
   -days 1024 -nodes -subj '/CN=local.finn.no'
When asked for «Common Name», fill in the hostname you use locally. Most FINN.no developers use local.finn.no
To set up nginx to start automatically on boot, Homebrew Services can set it up very easily.
# install Homebrew Services
$ brew tap homebrew/services
It is required to run nginx as root to open ports under 1024, and we want it to run on port 443. Homebrew Services will set it up correctly just by using sudo.
Start nginx (and install to /Library/LaunchDaemons):
$ sudo brew services start nginxHomebrew Services can also be used to stop and restart nginx
$ sudo brew services stop nginx
$ sudo brew services restart nginx
Now you should be able to open https://localhost/ and nginx should proxy pass to your local development server.
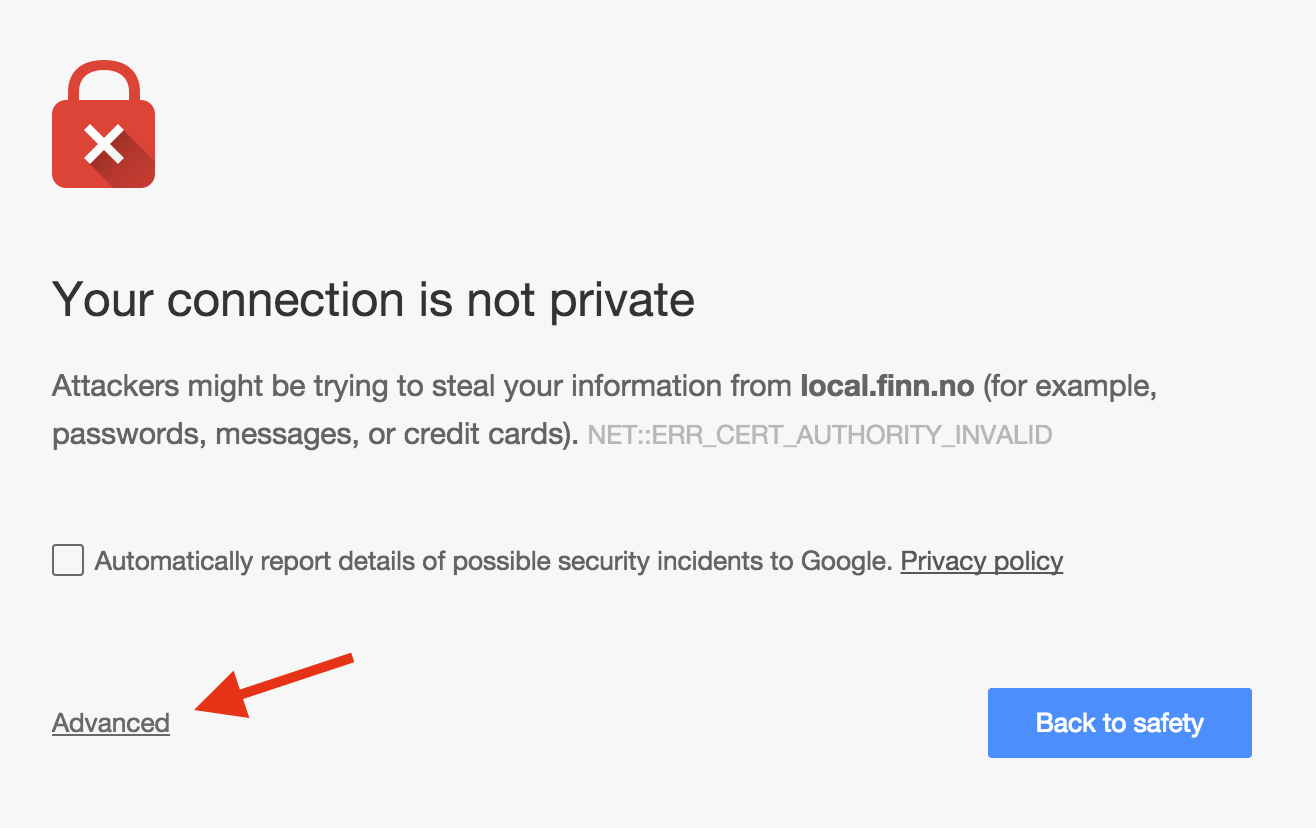
If you get a certificate warning, then it is working. It is only because you’re using the self signed certificate and not one signed by a certificate authority. Most browsers allow you to ignore the warning.
By adding the self signed certificate as a trusted certificate in System Keychain, we’ll get the green lock icon [4]:
$ sudo security add-trusted-cert -d -r trustRoot -k /Library/Keychains/System.keychain /usr/local/etc/nginx/cert.pem
If it doesn’t work, see the Troubleshooting section further down.
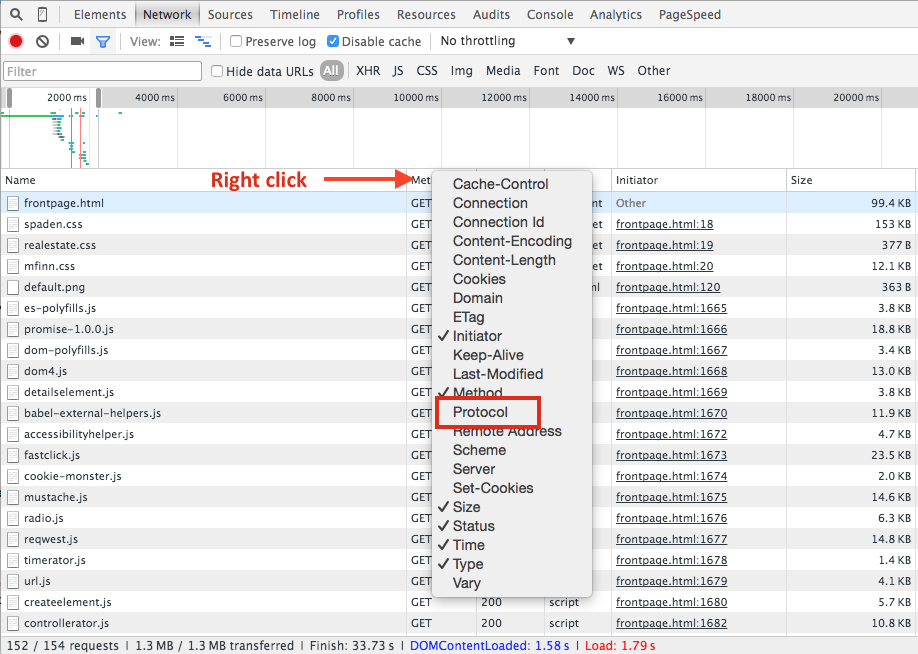
To see that you really are using HTTP/2 in Chrome, you have to open the Network tab in Developer Tools. Right click (or CTRL-click) the column heading above the network requests, then make sure Protocol is checked.
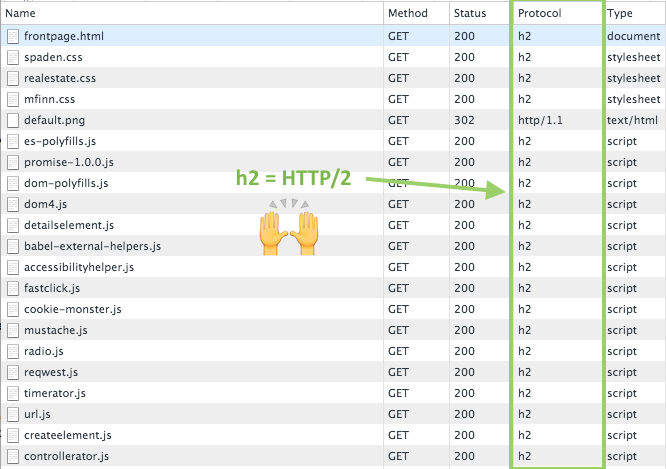
Then you should see HTTP/2 traffic show up as h2 in the protocol column.
Congratulations, you now have HTTP/2 and HTTPS working!
Thanks to Sveinung Røsaker, Rune Halvorsen, Tor Arne Kvaløy, Frode Risøy and Martin Solli for feedback and tips
Update Oct. 1, 2015: How to make the self-signed certificate trusted. Replaced custom aliases with brew services and added tips for common problems.
Update Jun. 20, 2016: Updated brew install command with the new nginx options.
Credit:
- https://www.nginx.com/blog/nginx-1-9-5/
- https://ma.ttias.be/enable-http2-in-nginx/
- https://ma.ttias.be/how-to-create-a-self-signed-ssl-certificate-with-openssl/
- http://apple.stackexchange.com/questions/80623/import-certificates-into-system-keychain-via-the-command-line
Extra
Install Homebrew
Run this one-liner in Terminal to install Homebrew:
$ ruby -e "$(curl -fsSL https://raw.githubusercontent.com/Homebrew/install/master/install)"

# if you haven't installed Command Line Developer Tools from Apple already
$ xcode-select --install
Troubleshooting
Connection refused
A “Connection refused” error probably means that nginx is not running correctly.
- Check that the ports in nginx.conf is not already in use
- Check that you run nginx as root (sudo)
- Check the error.log:
/usr/local/var/log/nginx/error.log
502 Bad Gateway
If you get a 502 error, nginx is running, but nginx is not able to connect to your development server. Check that your development server is running, and that you have the correct port in nginx.conf. Copy the value of proxy_pass and try to open it in your browser. For the config above, that would be http://localhost:8080.